
Download our thanksgiving kids paper circuit and create a festive LED turkey table toppers! Get photos and videos on how to make this fun science project!
Jump to a section
Introduction
Project Ingredients
Project Setup
Tips and Tricks
Conclusion
Thanksgiving LED Paper Circuit Project
Let’s make awesome, and bright, Thanksgiving table toppers. These fun paper circuit turkeys are a great activity to celebrate Thanksgiving, and learn about paper circuits at the same time!
Younger kids can color and cut the turkeys out, while elementary aged kids will be able to lay down the copper tape and wire up the LED themselves in this paper circuit project. Make sure to check out our blog post about troubleshooting paper circuits if this is your first time making one!
And don’t forget to check out our extensive Kid’s Paper Circuits collection in our shop! They are all downloadable with easy to source materials. Not only do they teach kids about how circuits work, but they also help kids learn perseverence, growth mindset, and problem solving! Plus, they are pretty cheap, and far easier than creating your own from scratch!
All our bundles are growing, so get in on the ground floor and get more templates as the bundles grow for free!

Project Ingredients
Kids LED Turkey Table Topper Setup

- Color your Thanksgiving turkey paper circuit template.
- Cut out your turkey.
- Follow the instructions below or watch the video for wiring your LED to the battery.
- Put your project together and enjoy!
Photo instructions for our Turkey Paper Circuit Project

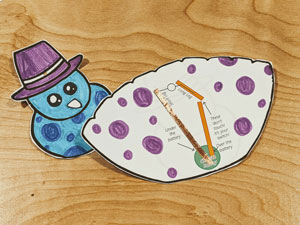
1. Color and cut your turkey out.
It is easiest to color your Thanksgiving paper circuit project before you have copper tape, batteries, and LEDs attached.
Leave a space to put names if you want to use these as place settings!
2. Lay down copper tape on the short leg piece
Lay down a single, straight, piece of copper tape following the yellow line that is outlined in black.
If your tape rips while you are sticking it down, make sure to peel it up and start with a fresh piece of copper tape.

3. Tape your CR2032 battery in
With the letters facing up use scotch tape to tape your battery in place. Make sure to leave a large portion of the top of the battery exposed so you can connect copper tape to the metal.
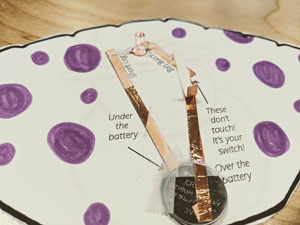
4. Lay down copper tape to the long leg and test.
Lay down two pieces of copper tape for the long leg. There should be a small gap between the two pieces, as shown on the template. This gap breaks the circuit allowing you to have a switch.
Tape the short leg of the LED to the short leg wire, and the long leg of the LED to the long leg wire using scotch tape. Use a piece of upside down copper tape to close the gap and test your circuit.
5. Put your LED circuit turkey together
Punch a small hole in the hat of your turkey body along the little belt and place it on top of the LED. You can tape or clip the body in place. If you want a pressable switch coat the back right 1/2 inch in copper tape. When you press over the gap it will close the gap and your LED will light up.
If you prefer to have the turkey LED always on usqe scotch tape to tape a piece of coper tape (copper to copper) across the gap.
