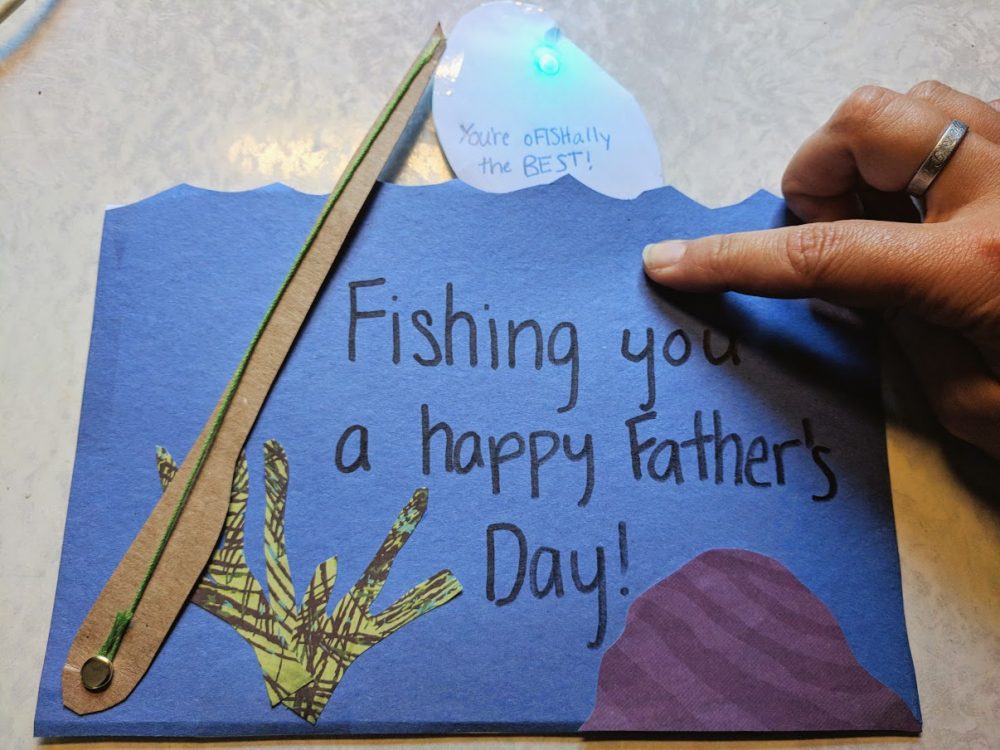
Create a fun moving card with some awfully fishy jokes.
What you’ll learn:
How to create a simple LED circuit card.
Key takeaways:
Switches are on when a conductor closes the gap between two wries. This will turn the LED on.
Dad is awesome. And cheesy. And he deserves a fabulous light up card just as much as Mom did, which is why we created a perfectly cheesy bad dad joke Father’s day carft for your kids to make this year.
This project involves simple mechanisms and simple circuits, although you can skip the LED circuits part of the card for younger hands.
Project Ingredients:5mm rainbow LEDCopper tapeCR2032 batteryBrass bradsScotch tapeScissorsStringTemplateCardboard (for fishing pole)
How to make a bad Dad joke Father’s day fishing card.
This is a fun hands-on project that involves paper circuits. If you find you love doing it, check out our paper circuit templates that you can print and play with!

1. Gather your supplies.
If you made our light up Mother’s day card you likely have all of the supplies you need on hand to make this Father’s day card. If not, you will need one CR2032 battery to power your circuit, copper tape to wire your circuit, an LED to light your circuit, and scotch tape to secure everything down. Don’t forget to print the template on cardstock.

2. Fold and cut your fish.
First, fold your template in half along the red dotted line so that the fish is on the outside. Then cut around the solid orange lines to get a fish that can unfold.

3. Start to wire your fish
Lay down copper tape for the two left lines on the template. One line goes to the LED, the other line goes under the CR2032 battery. The gap between these two pieces of tape is important as it will act as our switch.

4. Add the third copper tape wire and battery
The third line of copper tape goes from the LED to the top of the battery. I like to fold over the copper tape at the end so that the bare (non-sticky) side of the copper tape is in contact with the battery. Then use a piece of scotch tape to secure in place. Be careful not to rip this piece of copper tape as it rises to the top of the battery.

5. Poke the LED through the paper
Poke the LED legs through the paper as shown. Make sure that the long leg of the LED goes to the wire that goes to the top of the battery, the short LED leg goes to the wire that has the switch.

6. Bend and tape LED legs in place
Again, check that the long LED leg goes tot he top of the battery. Also, make sure that the legs are not touching each other.

7. Test your circuit
Use a coin or piece of copper tape to connect the two parallel lines that create the switch. The LED should light up. If not, check out common paper circuit troubleshooting tips.

8. Tape your fish together
Once your circuit works you can tape your fish together. The LED should be on the inside with the circuit components on the outside. This will create a slightly 3D fish.

9. Prepare the card template
Fold the second template and cut along the middle fold line as indicated by a long solid orange line.

10. Create the copper tape switch
Lay down pieces of copper tape in the thick yellow box on your template. This will act as a large area for the switch to make contact.

11. Insert the fish
Insert the fish so the head can pop out of the slit you cut earlier. Press below the fish to check that your copper pad will make contact and light the LED.

12. Add a fishing pole and string
Connect the nose of the fish to a piece of string that runs along a cardboard pole, or tape the nose of the fish directly to the fishing pole. Punch a hole through the folded card and fishing pole. Use a brass brad to secure the pole in place and allow it to rotate.

13. Decorate!
Make sure to add a silly message to Dad. Our two bad dad jokes were “oFISHally the best” and “Fishing you a happy Father’s day”, but I’m sure you can fish some more out of your head!

3 thoughts on “o-FISH-ally the coolest Father’s day card”
Comments are closed.