Make a simple LED circuit with pipe cleaners to brighten mom’s mug!
What you’ll learn:
How to wire an LED to a battery in this simple electronics circuits project.
Key takeaways:
There are a few rules when it comes to electrons moving through LED circuits, but you can use this mini electronics project to make art.
This fun DIY Mother’s day project teaches a little simple electronics to kids while creating a beautiful surprise for Mom.
You don’t need much, and you should definitely let your kids go hog wild when it comes to their final sculpture.
I love this project because the LED wiring is so simple and the pipe cleaners protect you from accidentally crossing wires, so there isn’t any fuss making the circuit work!
Project Ingredients:Pipe cleanersLEDs (you can also get them pre-wired if you want an even easier electronics project for kids)CR2032 Battery (1 per project/child)Mom’s favorite mug (or maybe a new one?)Tape (use Washi tape to make it extra awesome)
How to make a DIY Light up tea cozy for Mother’s Day
Alright, Dads, you can do this! The wiring is fairly simple, so your biggest helping hand will be helping the kids achieve whatever final sculpture they are hoping for. If you have more than one child you can work together and find a way to attach each cozy to one mug making a brilliant display for Mom!
It looks like a lot of steps, but they are all fast easy steps to take!

1. Gather your supplies.
You won’t need too much to make this simple electronics project – especially if you already got the supplies for our light up Mother’s day card.
If you want a kinetic piece to your tea cozy I would suggest getting rainbow LEDs like what we used, but single colors are also a lot of fun to design with.
You will need 1 battery, 1 LED of choice, and a bunch of pipe cleaners per child.

2. Prepare your pipe cleaners
Pipe cleaners hold their form because of twisted wire that runs through the tiny threads. The wire is conductive, the thread filaments are not. To attach a pipe cleaner to an electronics for kids project you need to strip the ends of the pipe cleaners of their fuzz.
You can easily do this by first cutting down the fuzz from the wire (aka, give the thread filaments a buzz cut). Then use your fingers to pull at the remaining threads that are still stuck in the wire.
When you are done you should have bare wire ends to two pipe cleaners.
Note: This only needs to be done to the pipe cleaners that will connect the battery to the LED. Pipe cleaners that will be used in the sculptures will not need to have this done (in fact, it is better to not do this).

3. Prepare your LED
To prepare your LED you will need to roll the legs into small loops. The easiest way to do this is to use a pair of pliers and roll the wire leg around the pliers.
Rolling the legs like this will help us get good contact between the wire LED leg and the stripped pipe cleaner wire. It will also allow us to have a reinforced structural connection.

4. Attach your LED to stripped pipe cleaners
Loop the ends of the stripped pipe cleaners through the LED leg loops you just created. Crimp down hard with pliers.
You should have a snug connection between the LED and the pipe cleaners. If not, crimp from a new angle.

5. Wrap the LED and pipe cleaners around the mug
One LED leg and pipe cleaner should wrap around in one direction, the other leg in the other direction – so the LED is straddling the mug. You should be able to pull gently on the pipe cleaners and mold them to get a snug fit around Mom’s favorite (or new) mug.

6. Test your circuit
Now is the moment of truth. Put one of the stripped pipe cleaner ends on each side of the battery and see if your LED lights up. If not, don’t fret, flip your battery over and try again.
LEDs are one-way streets, if you put the battery in backward it won’t light up. Since we didn’t worry about the long leg or short leg of the LED you have a 50/50 shot of putting the battery in correctly the first time.
Still not working? Check the connections to the LED, they are likely not secure enough or have too much fuzz on the ends.

7. Start your sculpture
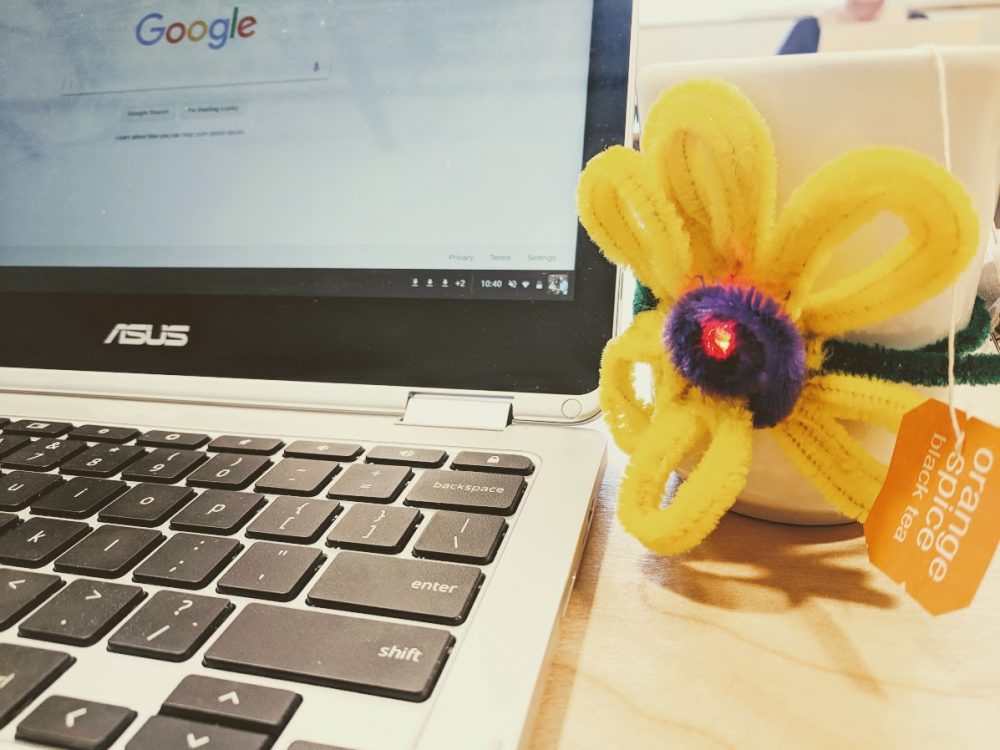
Now it’s fair game to add and connect anything you want to your LED mug. The fuzz on the pipe cleaners will prevent you from crossing wires so you are free to build, design, and play as much as you want. In the next few steps, I will show you how I made the flower.
To make a petal I zigzagged the pipe cleaner a few times before folding it over. This allowed the petal to be thicker than just a single pipe cleaner.

8. Add petals in
Your base pipe cleaners that are attached to the LED and battery will serve as the building posts for the rest of your project. You can either hot glue them in the back or twist them to make a secure hold on the cup.
To add in a petal just thread it under the pipe cleaners and twist into place.

9. Keep adding petals in until you finish your flower
This, of course, assumes you are making a flower. If not, keep adding in the pieces that make your art fabulous!

10. Cover the middle with another pipe cleaner
You can add a nice finishing touch to your electronics project by adding a loop or two of contrasting pipe cleaner to the middle. This covers up all the various connections you have made and showcases your LED.

11. Prepare to attach your battery
I choose to crimp a paper clip onto the end wires of my cozy. If you do this just loop the fuzz-free pipe cleaner end around the paper clip and crimp.
You can also tape the two bare wires onto the battery and be done!

12. Secure one side of the battery
Using tape secure one side of the battery. For a more secure connection, you can use a bit of copper tape to connect the paper clip to the battery and hot glue it in place. Don’t try to hot glue just the paper clip – the glue will often get under the paperclip as well breaking your connection to the battery.

13. Secure the battery in place
You can do this with tape or hot glue onto the mug itself.
1 thought on “LED Mug Cozy: A mini electronics project kids can make for Mother’s Day”
Comments are closed.