Use chemistry to make super cool Easter eggs
There are all sorts of ideas on where the practice of Easter egg dying came from. Some suppose it was Mary Magdeline, whom upon bringing a basket of cooked eggs to share with others mourning Jesus’ death found the tomb open and her eggs bright red. Others date the practice back to royalty when King Edward I ordered hundreds of eggs decorated with gold leaf. Whatever the true roots of the tradition may be, I think we can all agree that dying Easter eggs is a fun spring tradition.
Looking for an educational Easter egg coloring idea?
We have a great Easter science-based craft project for you: Easter egg decorating with a natural pH indicator that is also a natural Easter egg dye. Not only can your kids learn about natural Easter egg dyes, they can also learn about color changing pH indicators as you elicit a lot of “woah, Mom!” out of them. Being able to draw designs on an Easter egg in lemon juice is certainly an activity to behold.

Project Ingredients:Purple cabbage (or another natural pH indicator)Pot and jarWaterLemon juiceToothpicks for paintingBoiled eggs
How to make a color changing egg with a natural Easter egg dye
- Cut up what you are using for your natural pH indicator egg dye (we used purple cabbage and turmeric)
- Boil purple cabbage or beets until the water is darkly colored.
- Boil raw eggs in the colored liquid for 8-12 minutes.
- Set eggs overnight in the natural Easter egg dye.
- Remove eggs and use toothpicks to paint lemon juice designs on the eggs.


Easter egg decorating with natural Easter egg dye
1. Cut up what you are using for your natural pH indicator egg dye
There are a lot of natural pH indicators that you can use as a natural Easter egg dye. We used a mix of purple cabbage and turmeric for ours. The blue/purple from the cabbage mixed with the yellow/orange of the turmeric-dyed our Easter eggs green. The process of cutting up your fruit/vegetable gives it more surface area, which allows the next step of boiling to extract more of the natural dye.
2. Boil purple cabbage or beets until the water is darkly colored
Whatever you choose to use you are going to want to cut up and boil the natural indicator for 20-30minutes. This process helps remove the dye from the vegetable/spice/fruit and put it into the water. When done the water should have a very deep color. You can either strain this liquid to boil your Easter eggs in, or you can boil your Easter eggs in with the natural dye sources, which is what we did.
3. Boil raw eggs in the natural Easter egg dye for 8-12 minutes
The amount of time you boil it is far more important if you plan on also eating these Easter eggs. Since the Easter egg dye and the lemon juice we use to change the color are edible, these festive eggs are safe to eat on Easter if you desire.
4. Set eggs overnight in the natural Easter egg dye
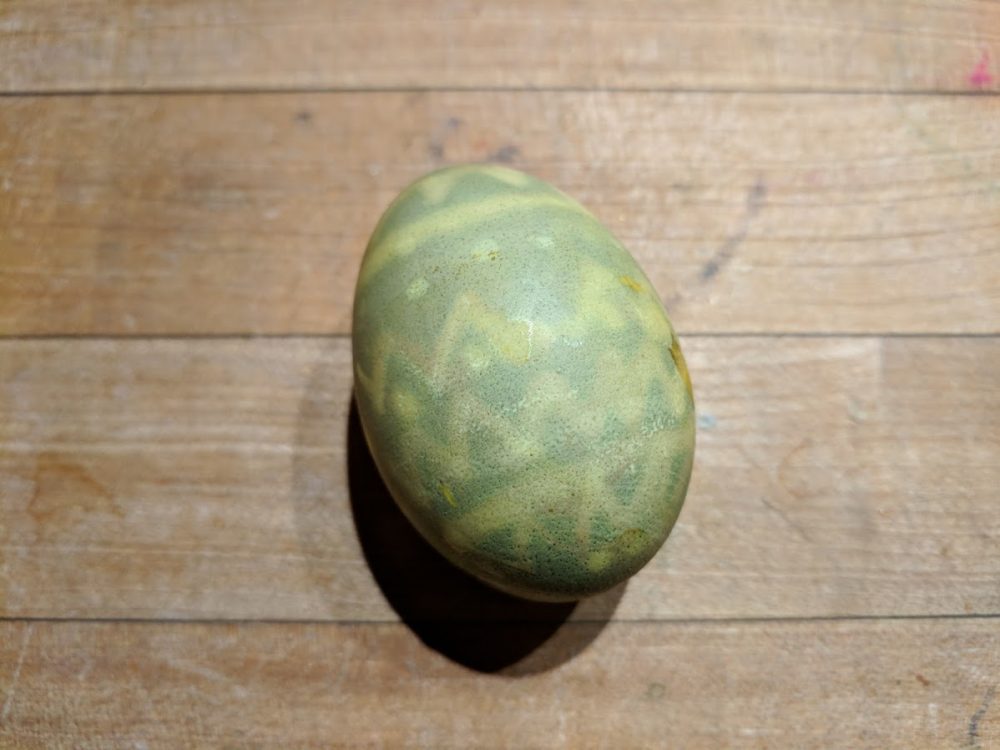
The dye does not really adhere to the Easter egg during the boiling process. From the image on the right you can see what an egg looked like right when it was pulled out of the natural dye, then after two hours sitting in dye, four hours sitting in dye, and finally sitting in the natural dye overnight. You can see the shade of green gets considerably darker as time goes on.
5. Remove eggs and use toothpicks to paint lemon juice designs on the eggs
Since the Easter egg dye we used is also a natural pH indicator it will change color in the presence of a strong acid or a strong base. The color your Easter egg changes to depends on what you use (lemon juice versus citric acid), and the natural Easter egg dye you choose (beets versus cabbage versus turmeric etc). The color of our eggshells changed from green to yellow when we painted on lemon juice, an acid.
We used toothpicks to make more interesting designs, but you can certainly use a paint brush, or even dip your egg if you want broader designs like a half and half Easter egg.
Check out our other fun science activities!


5 thoughts on “Color changing Easter eggs”
Comments are closed.