Learn how simple motors change current into movement
What you’ll learn:
How to make a DC motor
Key takeaways:
The interplay of a magnetic field and a current can drive a motor.
DC motors are used in lots of small toys that go zoom. These motors run off of batteries that supply a direct, constant, current. This is unlike the power that comes out of our walls which is AC, or alternating current (imagine water sloshing back and forth instead of a stream flowing).
These DC motors are often housed in a metal casing with two prongs that lead to the battery and a shaft that then spins. But how do DC motors work?
In this activity we will build a DC motor without it’s metal casing so you can see what is happening with power, current, and magnetic fields.
Project Ingredients:Enameled copper wireBrass bradsPaper clips9V battery connector9V batteryCardboard
How to make a DC motor.

1. Gather your supplies.
This project uses common classroom supplies to show kids how motors turn current into motion. Kids can work individually, as a group, or as a class to create this demonstration.

2. Coil and prep the copper wire.
If you crack open a DC motor you will find tiny coils of copper wire wound over and over again. By doing this we create a bunch of current loops since the current from the battery goes through each loop the current through the whole of the coil is much greater than the current through a single wire.
Coil the copper wire around an object like a thick marker or small paint cap. Aim to get between 20-40 turns on the coil for best results.

3. Attach the battery connector
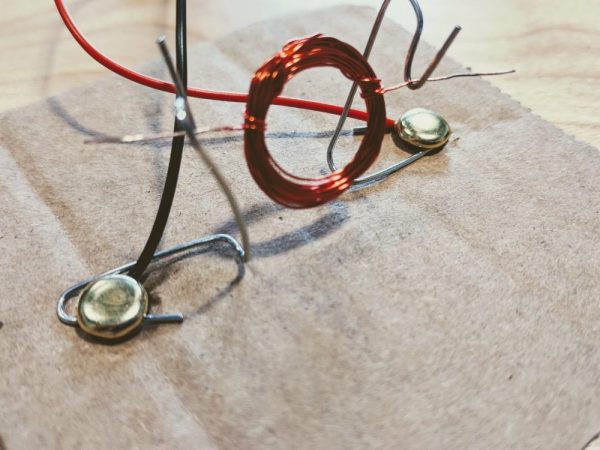
The battery connector has two leads, on red and one black. Each lead needs to be connected to its own brass brad as shown. Twist the wires from the connector around the brass brad to make a solid connection.

4. Secure the brads on the base
Using a single hole punch create two holes in your cardboard base about two inches apart. Put your brass brads through the holes and secure by flattening the wings on the back side.

5. Bend two paper clips
These paper clips will wrap around the brads and hold the copper wire coil in place. Bend them similar to the photo shown. Note that you will need to use wire paper clips, not plastic, or rubber covered paper clips.

6. Attach the paper clips.
Slip the bottom of the paper clips into each brad and align the top coil holders so they will fit the copper coil.

7. Complete the circuit and add a magnet
The copper coil will complete the circuit when it is laid across the paper clips. Strip the ends of the copper wire with scissors so the copper and metal of the paper clips can touch.
Add a magnet directly below the coil and glue or tape in place.
8. Attach the battery
We need a current to go through the copper coils, which means we need something to push the electrons, some source of power. For this, we are using a 9V battery (although a 6V AA battery pack would do the same thing here). Once you plug the battery in you should notice the coil ‘spring’ into position. Give the coil a tap and it should start up spinning right away for you. Congrats! You have turned a direct current into motion that could drive a toy car!