 I can’t believe it, Thanksgiving has not even come and gone yet and it is already time to start thinking about decking the halls, breaking out menorahs, and trimming trees. There is plenty of time during school vacations to set up kids science activities that blend science, art, and the craft of becoming a Maker.
Our first project this year was holiday hangers, and with the right supplies you can even make these beauties light up teaching kids basic circuit building skills – don’t worry, no soldering required in this project, and the three key elements can be sources from most local stores!
Project Ingredients:LEDsCopper tapeWood slices (if you don’t want to make your own)
 The project starts off with a good old-fashioned stick hunt. Kids can scourage the yard or nearby forest for thick sticks, preferably 2 to 3 inches in diameter (ooh! You can even talk about measurement units and what the diameter of a circle is!). If you are lucky, these sticks will already be dry, if not, don’t worry, once they are cut into slices they will dry quickly. If you want to dry the slices our faster you can always bake them in your oven at 150 degrees for five or ten minutes.
 Speaking of slices, that is the next step. Once you have found good thick sticks you will need to break out a table saw. I am always a big proponent of kids learning to use power tools. It teaches them about safety, responsibility, gives a huge sense of empowerment, shows them they are capable, builds vocabulary, and more. I’m not saying to just set up a table saw and let your kids go for it – that is a recipe for a missing hand. But, I am saying set up the saw, break out the safety glasses and have them right next to you as you show them how to make the slices. You can even let them be the holder of the stick being cut, or allow them to control the height of the saw. Whatever responsibility they have, however, they should be able to see the wood being cut and hopefully have a hand in helping.
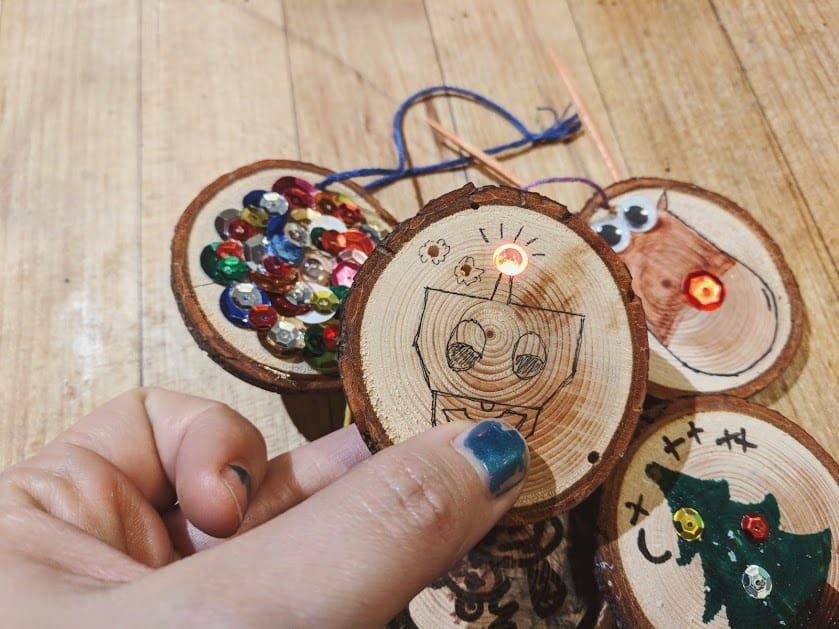
If you don’t have a table saw, or if foraging the forest sounds like no fun to you, you can always order wood slices online. Once you have a nice pile of wood slices it is time for the creation to begin. Break out glue, markers, googly eyes, sequins, glitter (if you dare), feathers, or any other type of decorations your kids love. Our kids had friends over for this project and they spent an hour furiously decorating the wood slices. We had to encourage them to slow down and really focus on quality over quantity. However, with a plethora of sticks in our forest we never had to worry about supply, which is good, since they made about 10-15 each.
 Once they had decorated their hangers we got to break out our drill to make holes for string. Yet again, the kids loved this part. We showed them basic drilling mechanics one or two times and then watched them as they did the rest on their own. They were beside themselves that they got to operate the drill. One of the great benefits of giving kids power tools is they very quickly learn how to cope with failure, and also learn how to really pay attention and focus on the guidelines you give them. After one or two poorly drilled holes that ruined a meticulously made hanger they kids were all much more alert and focused when holding the drill. Don’t want to saw or drill your holiday hangers? You can purchase presliced, pre-drilled wood slices online too!
 To make the holiday hangers light up you will need a few supplies: LEDs, copper tape, and CR 2032 batteries. If you want to make it a little fancier you can add in a battery socket with a built-in switch, although you will likely also need conductive paste to help with the extra connections (you can also make your own with our conductive paint recipe). Check out our curated Amazon list of supplies!
You will need to drill a hole that is 5mm wide where you want to put the LED. Then push the LED in from the back, fold down the legs and tape the battery between them. If the battery doesn’t light up the LED right away flip it over. Unlike regular lights, LEDs are one-way slides for electrons. If the battery is in the wrong direction you will have a bunch of electrons at the bottom of the slide refusing to climb up, and the LED won’t shine! If you want to extend the legs of your LED you can use copper tape which will act like a wire (since copper is a conductor).
Check out our other fun winter crafts!


Learning the science behind our light up holiday hangers
Learn how LEDs work and the importance of kids using power tools so you can teach your kids while engaged in this fun science project!
What are LEDs? LEDs are Light Emitting Diodes. They are tiny compared to a light bulb but still pack a powerful punch with a ton of benefits. Although sometimes these benefits, like the fact that they do not produce heat, can also be drawbacks, as seen when cities swapped in LED traffic lights that no longer melted the snow. Other benefits of LEDs are the ability to control the direction of emitted light, so street lights can point only down instead of into the sky as well. Some LEDs create infrared light that we can’t see. These LEDs transmit the information from your remote control to your TV.
How do LEDs light up?LEDs don’t have a filament like a regular light bulb. In regular light bulbs, electrons cruise through this filament bumping into tons of atoms in the metal, shaking things up, and creating a ton of heat. That heat makes the metal white hot, which is what our light comes from. An LED doesn’t convert electricity into heat into light but instead converts electricity straight into light. In an LED two semiconductors, often gallium and phosphorous, are layered together. The gallium has a ton of holes, while the phosphorus has a ton of electrons. The electrons then slide down into the holes and create light! You can pretend to be an electron in our circuit obstacle course that mimics various circuit parts!
Why doesn’t my LED light up? Learning circuit basics. There are a few reasons why your LED might not light up, and many of them are pretty easy to troubleshoot. The first thing to try is switching around the battery. LEDs have two legs, one leg is longer than the other leg. This is the positive leg, and the shorter leg is the negative leg. The LED will only light up if the positive (long) leg is touching the positive part of the battery (the top), while the negative (short) leg is on the negative part of the battery (the bottom). If that doesn’t fix the issue try a different LED and a different battery – it is possible that one of these components is not functioning! If your child is having a blast building these circuits check out our squishy circuits lab that creates circuits with playdoh!
How can I make a switch? Simple switches to keep your battery life long.If you have your LED lighting up and inserted into the hold of your holiday hanger you can use tape to keep everything in place. If you want to make a simple switch keep the top leg out of the tape, which will open the circuit. When the circuit is open the LED is off. Then tape down the top leg to close the circuit and light the LED.
Kids and power tools. Do you really think it’s safe?I am always very careful to make sure my kids don’t have access to life-threatening types of risk – risks I call the one hit wonder. They do, however, have lots of access to knives and tools that might be dangerous. We have even let our 7-year-old use an Exacto knife under close supervision where we watched her hold on the knife, her hand placement, the project requirements etc. Essentially, we set her up for success, watch her closely in more dangerous situations, and let her make the decision on if the risks seem too much to her. If she had felt like she couldn’t use the drill safely, we would have absolutely stepped in. If she had shown us she couldn’t use the drill safely, again, we would have absolutely stepped in. Studies have shown that allowing kids to partake in such risky behavior actually makes them healthier. The key is finding the right age-appropriate tools for kids to use, knowing their limits, and assuring their safety.
Invalid shortcode parameters
8 thoughts on “Light up Holiday Ornaments: Winter Science Projects”
Comments are closed.